You Know You Need an Active Facebook, But Where Do You Start?
5 Steps to Build the Perfect Facebook Page with your Patients in Mind
I say, “with your patients in mind” because many chiropractors gear their Facebook and other social media (not to mention websites and blogs) towards things Chiropractors are interested in, not towards their patients and potential patients. Sometimes it’s difficult to separate this with social media since we are so used to communicating via social media on a personal level.
A Few Mini-Mantras to Repeat During the Setup (or Edit) to Your Facebook Page
"My patients are not chiropractors." (noted: there are exceptions)
"My patients and potential patients have interests besides just chiropractic care."
"My Facebook should be geared to my local community." (This helps with local search results)
Step # 1: Fill out your basic business info
CLICK HERE to create a BUSINESS PAGE on Facebook
You will be given the following 6 category options for your page:
- Local business or place
- Company, organization, or institution
- Brand or product
- Artist, band, or public figure
- Entertainment
- Cause or community
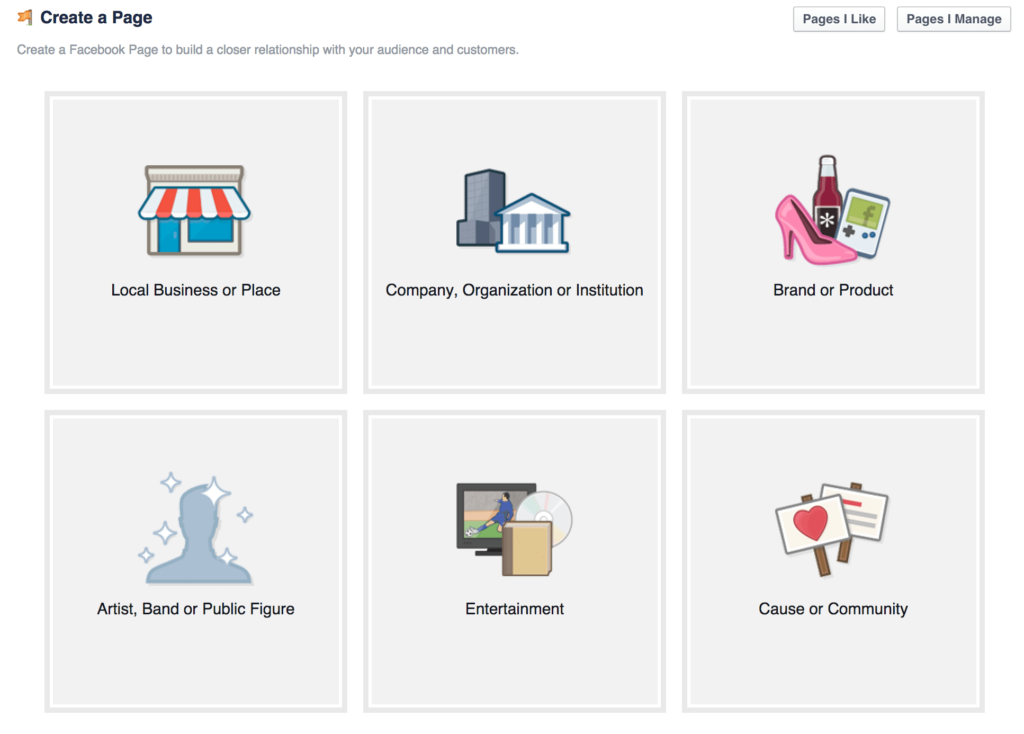
In most cases, you will choose #1. (Local business or Place) for your chiropractic practice.
In the case you are a part of a large clinic, hospital, etc. you might choose #2. (Company, Organization, or Institution). If you have any question as to what to choose please call us or set up a 1-on-1 call to discuss what category makes the most sense for your practice. You are able to change this category down the road if necessary...so don’t let this hold you back. Continue setting up your Facebook page properly.
Note that as a “Local Business or Place” the physical address of your practice will appear very prominently on your Facebook page. This type of Facebook page renders differently than the other categories.
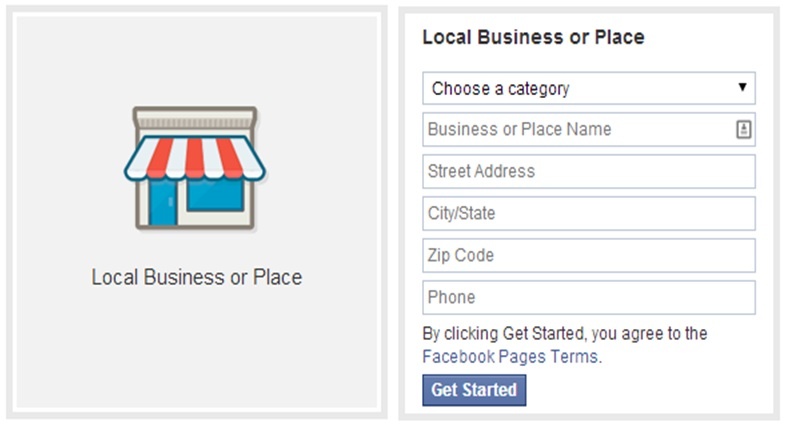
Here’s what it looks like when you select the “local business or place” category
Step #2 - Standard Business Details
After you have selected your category you will be asked for specific information. Since you likely chose “Local Business or Place” the information you will need to supply is the following.
7 Items You Need to Have Available (don't take any shortcuts)
- Page Name - Use the same name as your Google My Business Listing and what you use across the board. In most cases, this will be the name of your practice, not your own name.
- Page Category - Chiropractor
- Street Address - Use the same exact format as you use for Google My Business and all other directory listings, or otherwise.
- City - See note above
- State - See note above
- Zip Code - See note above
- Phone - See note above
IMPORTANT!
If you’ve read our other blogs you know about the importance of your Name/Address/Phone (NAP) data being 110% consistent across the board. NAP Discrepancies are the #1 reason local businesses find themselves suffering in their local search results.
Step # 3 - This is the Chance to WOW Patients!
5 Things You Will Need to Provide
After you select your category and fill in the information requested the next screen will request the following information.
1. Descriptive Sentence (or two) About Your Practice
This shows up very prominently on your Facebook page on both desktop and mobile! You are allowed 155 characters to describe your practice in the most dazzling and descriptive way possible. Make it shine and keep your messaging consistent with your branding!
2. Website URL
If you don’t have one, you need one. Please contact us to discuss our results based and SEO optimized N8 Chiropractic Websites. Our websites work out to be only $1.66 per day! Your website is a direct reflection of you and your practice. Make sure it works FOR you, not against.
3. Facebook page URL/username
This is the URL of the page you are setting up or editing now! In some cases, you will be offered a vanity URL. If you have over 25 fans already you will have the opportunity to “unlock a custom URL”.
For example - facebook.com/yourpracticename
If you aren’t offered either, don’t get hung up on it. Keep setting up your page.
4. Profile Picture
Upload a main profile picture/logo for your page. If you have a custom logo you use for branding USE IT! This will appear as your icon on any post you publish as well. Think of this as a branding opportunity. You will want this to be a SQUARE, not a rectangle as Facebook forces rectangles into square. The round peg, square hole dilemma. Square peg = square hole.
Profile pictures need to be at least 180 pixels wide by 180 pixels tall.
Please find a complete list of sizes Facebook uses for your uploaded profile picture in various places around the site. Make sure your image looks good in each of these sizes. Again, this is a branding opportunity. You want to make sure it looks polished and professional across the board.
The main profile image on your page – 160 x 160
In a news feed – 100 x 100
In your timeline – 86 x 86
Next to comments – 43 x 43
5. Category Tags
Since you have most likely selected “Local Business or Place” you will also be able to select category tags to add more detail about what you offer at your practice. If just Chiropractic suits you fine, that’s all right too.
Steps #4 & 5 - Pssst...You Can Skip These Steps For Now
Step #4: Add This Page to Your Main Facebook Menu
This is for your convenience when you are logging in each time. Perhaps this is your only Facebook page. In that case, the username and password you used here will be what you use to log in.
Step #5: Promote Your Facebook Page - Setup an Ad
Facebook will also ask you to take the step to set up a Facebook ad to promote your page. You don’t have to do either of these steps right now. So, again, don’t let this hinder you from getting this all set up. Even without doing these 2 steps after clicking submit your page will be live for everyone to see!
Extra Credit Steps - Create a Cover Page Photo
Create a Whiz-bang Cover Image (without a designer)!
If you want to dress your page up, even more, follow the specifications below to create a cover image. This is what people will see first. So make it really drive home the branding of your practice!
Diagram of ALL Facebook Dimensions: (828 x 315px is for the Cover Page)
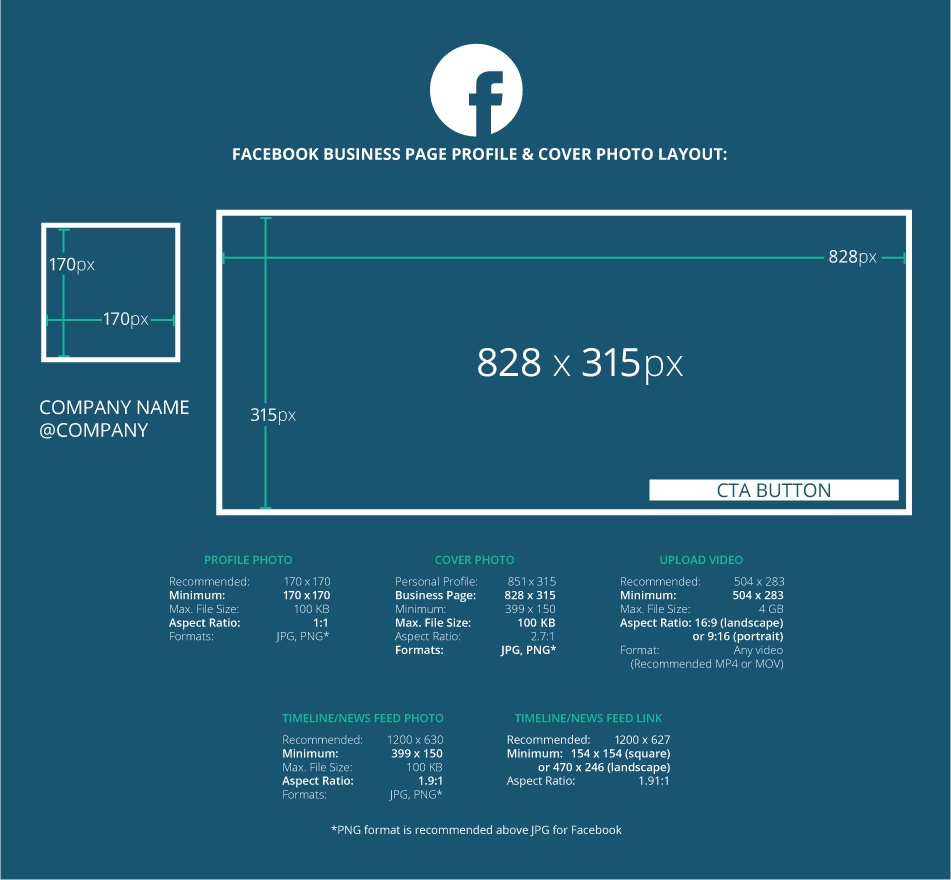
These dimensions are updated as of May 2017
Important Note regarding Size for Mobile Devices
The size 828 x 315 is for your cover page photo. It’s important to note that Facebook strips out 144px on each side of this photo when rendering on mobile devices. So, keep in mind it’s the center of the photo that counts most. Specifically, 563 x 315. The height remains the same, but the width will be shorter.
Don’t Panic!
Don’t despair if you have no idea what px (pixel) means. You still don’t need a designer. There are many simple tools you can use to help you. A few we like (and use) are Pablo (Buffer’s tool), Canva.com and Spark from Adobe. You will have the option to choose sizes specific to various social networks and standard online ad sizes. Choose Facebook. From there you can choose from a variety of nice templates/layouts as well as upload your own photo or choose from thousands in their free photo library. It’s easy, I promise!
Congrats - You've Channelled Your Inner Artist!
Once you’ve created your beautiful cover page simply click “Add a Cover” and upload your creation! Once uploaded you will have the opportunity to move your image around and set to your exact specification in the window. When satisfied click “Save Changes”!

Expert Tip - Start Tagging (legally)
Once you have uploaded your cover page the photo is automatically added to your timeline. That triggers an “Update” to your timeline. If you simply click on the photo you will have the opportunity to add a description to the photo. DO THAT! Also, add tags just as you would keywords. Promote your practice whenever you have the opportunity to do so. As mentioned, Facebook is an excellent tool to attract your local audience. They also have simple (user-friendly) tools for boosting posts and promoting your site and at manageable price points.
What's Next?
Make sure you have added as much information as possible to truly convey the mission of your practice. Just like SEO and your website you can’t simply set it up and forget about it. Clearly, this is even more true with your social media. You MUST update it on a very regular basis.
In a previous blog called, Being Anti-Social on Facebook Can Be Hurting Your Bottom Line. Be Socially Active, I mentioned the necessity to be consistent with your posts in order to convey an active and thriving practice. It’s completely understandable that you likely don’t have time to post daily. Weekly would be a great goal, but definitely, supplement this with a service such as our Automated Chiropractic Social Media. We can post daily or less if you prefer. All of our Automated Social Media drives people TO your site, NOT to a random article online. This is an important point, as many services don’t drive the articles and videos they post directly to the client’s website. We tell our clients to be active in their communities. Be sure you post things about community events, local events you are involved in or invite them to events. Whatever it might be to draw in your local community and get them coming through your door.
Conclusion
If you would like to discuss how to set up your Facebook page, your current website and/or Automated Chiropractic Social Media don’t hesitate to schedule a 1-on-1 call with us. If you choose to sign up for Automated Social Media ($29.99) we will be happy to waive the $100 setup fee for you. We are not a sales organization, we are here to answer questions and give you tips and tricks for DIY options as well.
Thanks!
ChiroHosting Team

